Wednesday, July 3, 2013

Style and Sew an A-Line Skirt

That's the name of a Craftsy class taught by Deborah Moebes. Or maybe it's Design and Sew. Anyway, here is my first "muslin," or practice skirt, made to fit my own measurements:

From the front it looks fine, although the sides kind of stick out. From the side, though, it looks almost like a pencil skirt, with no shape in the back. Or, wait! Maybe that's me that has no shape in the back. :-)

So after I tried the first version, I followed her directions for "slashing and spreading" the pattern to make a fuller skirt. I cut six slashes from the hem to, but not through, the waistline, and then spread each one by half an inch at the hem line. This added three inches to this quarter of a skirt, or twelve inches total to the hemline of the whole skirt.


So now I've got a skirt shaped more like I had imagined that I'd like it to be. In fact, it's really similar to my favorite grey wool skirt that I wear so much. Except that this one is blue and made of cotton and doesn't have six "gores" in it. But I mean, you know, similar shape.


And the side/back seems to work better now, too.

So after I made the practice versions, I made a "real" version out of this blue cotton "jacks" fabric that I bought a few weeks ago in order to build up my stash for the Style the Stash Sewalong. I used the practice skirt, above, as the lining.

And.... I like it! One thing's for sure, it's very comfortable. And it fits me.


I put in an invisible zipper for the first time using an invisible zipper foot, and it worked! I was so tickled with myself. Mixed in with all the metal attachments that come with my sewing machine from my mother was a baggie that had these plastic invisible zipper foot attachments. Two years ago when I made Melinda's wedding dress, I had no clue how to put in an invisible zipper. Now, thanks to Deborah and also Sunni Standing (with her free zipper class, also on Craftsy), I knew what to do.


I didn't tell you then, but I'll tell you now, that I had actually tried to insert an invisible zipper into that dress that I made in May. Deborah says you can just use a regular zipper foot to do it, and that's what I tried to do, but it didn't work so well. You can see the zipper in several places. I could have unpicked it and re-did it, but it's behind me where I can't see it, so it really doesn't bother me. :-)


I've had people ask me why I'm so determined to learn to sew my own clothes. One reason is because it's helping me be more aware of my body and its shapes and sizes, and hopefully to help me appreciate it as is, even as I'm working on getting healthy and strong again. And another reason I'm working on sewing my own clothes is because I'm loving the learning process.

I'm really excited about trying some more skirt variations. This could get addicting!

Friday, June 28, 2013

Knit top

Simplicity 1716 is a pattern that got high marks on Pattern Review. I made it with a lightweight cotton knit fabric. I started it yesterday and finished it today. I like the interesting and modest neckline. It was fun to figure it out.

The sleeves were fun to make, too, and I like how they cover my upper arm.


As long as the fabric holds up alright, this should be a functional and cool top to help me get through these hot summer days.

Ruffling foot

Things have been a bit hectic since the wedding, but are starting to settle down. Two days ago I was ready to get back to sewing things for myself. We had moved my machine and other sewing essentials to the attic where I could have some space to finish up the wedding sewing when children and grandchildren were filling our home. Advantage: great escape. Disadvantage: hot attic. So before I could start sewing on a top that I wanted to make, I decided to make some curtains to cover the south-facing window.

I use my mother's "vintage" Singer sewing machine, model 15. It's the one I learned on, and I love it. The only thing it can't do, I think, is zigzag. It has an amazing buttonhole attachment that makes perfect buttonholes every time. And it has this ruffling foot.


I had never tried it before, even though many of those little girls' dresses that I made had to have gathered skirts, basically because I wasn't sure how much of them would gather and whether or not the gathers would be adjustable to make the skirts fit the bodice.


But, curtains--that would be a great opportunity to just ruffle up some strips of fabric and sew them around the edge.


And I did it.


Okay, don't look too closely, as they are by no means perfect. But they are functional, and kind of pretty, I think. I lined the fabric with that blackout lining in an effort to keep some of the heat out. And I used the top ruffle as the curtain rod pocket--probably a real no-no. But, hey, they add color and functionality to my new room, and I think they're kind of fun.

Wednesday, June 12, 2013

Big Girls' Dress

This is my oldest granddaughter, and she's modeling Butterick 3714, made of pink satin Casa fabric from JoAnn's, fully lined. I haven't reviewed it yet on pattern review, but I need to, as this is the third time I've made this dress, and I love it.
The bodice and sleeves are overlaid with matching pink sparkly organza

It's a pretty good dress for twirling.

The lining supports a tulle ruffle that helps the dress stand out away from the body.


I made two of these dresses, both size ten, but one for each of two very differently-shaped young ladies. For this one, I did the size ten for the length, but cut the size eight for the width, and  it is still a little loose on her. For the other, I took some length out of the bodice and the skirt, but added width to the waistline. When I get a picture of the other girl modeling hers, I'll post it as well. Between the satin, the lining, the organza overlay, and the tulle, each dress probably took, oh, about six yards of fabric.

Wow! I hadn't stopped to realize how much fabric each dress takes. Oh, my.

Stay tuned for the middle-size girls' dresses, to be posted sometime in the next couple of days.

Baby's dresses


This little girl is the youngest of three little granddaughters who were born into our family last year. The dress she's wearing is made from McCall's 2053 out of primrose pink Casa satin, lining and organza from JoAnn's. Her two cousins have similar dresses made of the same fabric. I used a grey satin ribbon and sewed it just under the bodice in the front, with ties for a bow in the back. Her mama made the roses for the hairpiece in her headband. There is also a matching set of panties to go with each dress. Total yards? I don't know. Probably a yard each of the satin, organza and lining, plus an additional half-yard or so for the panties, for each dress. 

Shark fin


Here's the skirt and blouse that I made/am making for the wedding. I think the skirt needs some pressing. When I look at my profile in the mirror, all I notice is the gusset sticking out the back, just like a shark fin. I hope I can get that to relax into place!

Obviously the fabric does not have the drape that is needed for this pattern!

Okay, so I cut a triangle out of the back.

And it worked!

It doesn't have as much movement, but it's not really restrictive, either. so it works.

Shark fin is gone.

Woohoo!


I forgot to mention that the skirt is made with McCall's 5523, and the blouse is my second version of McCall's 6035. The first has roll-up sleeves and a collar; this one has short sleeves and just the collar band. I really like this pattern as it is comfortable and it fits and it feels good to wear something that I made and like!

Saturday, May 25, 2013

Stash to Style

This weekend Joann's has their Red Tag Fabrics 50% off, plus they sent out a coupon for an additional 10% off your total purchase. 

I picked up this Lisette poplin for $3.50/yard, and there were just over three yards of it. I'm thinking it'll make another dress.

This "jacks" fabric appealed to me, too. How about a peplum top?

And with the swimsuit sewalong going on, I couldn't pass up this $7/yd swimsuit fabric. I got two yards of it so I could possibly make one for me and one for a child. I've never sewn a swimsuit before, but they say I can do it, and I'm willing to try!

And, finally, I bought the whole 10-yard bolt of this blue $2/yard cotton fabric. I mean, it'll come in handy for making practice outfits, if nothing else.

Hey! I've gotta build up my stash before I can start sewing from it, right?

Check out the new blog that Sarah Liz of Australia has invited me to join: It's called The 2013 Style the Stash Sew Along. I love the rules that Sarah Liz has set for this sew along, and I'm excited to participate. I'm hoping to use this opportunity to sew some practical clothing for myself.

I hereby invite my friends and daughters and anyone else who may be interested to join us. It'll be fun!

Monday, May 20, 2013

Vests Burda 2622

These boy's vests range in size from 3 to 13. I've made one size 3, three size 4, a size 8 and a size 9. I've made simple vests before, but these ones have a more formal look to them. The fronts have darts and plackets,

and the back has straps and a buckle.

I used a shiny silver polyester satin, and used the wrong side of it for the plackets in front and the straps in the back. Then a black polyester lining for the inside. I'm sewing these for my grandsons to wear at my son's wedding next month. I have one more still to sew, for the little nephew of my future daughter-in-law. I think they turned out really nice. It takes a couple of hours to do each one, and they are not hard to put together.

The inside lining and front facing:


Six of the vests completed, laid out on my kitchen table:

Friday, May 17, 2013

Simplicity 1914

I promised pictures, and here they are. Because it was the middle of the day and the sun was bright, I tried to stand in the shade of the house with my picture-taker, aka husband, also trying to stand in the shade. I appreciate his willingness to help me with my projects.


I'm really pleased with my new dress. It has its issues that could be better, but, hey! It's the first dress I've made for myself in a long time that I feel comfortable wearing. It's made of a lightweight rayon challis that I bought at Hancock's in Orem, and I like the fabric and the colors. 

I have mixed feelings about the wide neckline. I like it because I think its width helps my shoulders look a little broader, but I don't like that I have to keep tucking my underwear out of sight. I used the long sleeve pattern, but shortened it by a couple of inches. If I make this dress again, I'll do the same thing but shorten them even more. I had added width to the waist, but ended up taking about 1/2" back in on each side, for a total of 2 inches less on the waist than I had thought I needed. I had already taken that much in near the top of the side seam, right under the armscye, and when I took in the waist I would have liked to take in more at the top again, but I was too lazy to undo the sleeve and reset it. I added about an inch and a half to the length of the dress because I wanted to make sure it was long enough. Maybe it could be a little shorter, but I think I do like the length.

As for the fitting concerns that I talked about in a previous post, I was able to do some fine-tuning on the bodice front. I adjusted the princess seams to make them a little more fitted around my bust; maybe what I did could be called an SBA: Small Bust Adjustment. And I unpicked the bodice from the neckband and pulled it up a little, shortening the length of the bodice above the bust. That seemed to help with the neckline gaping issues that I had been having. Normally I guess I would have taken it up in the shoulder seams, but the neckband really didn't allow for that. It was interesting to me to note that of all the fitting tips given in this "Amazing Fit" Simplicity Pattern, it never addressed this issue of the gaping neckline. What I did could probably use some fine-tuning, but I think I figured it out okay. If I ever make this dress again, I'll try it in a size 16 to start with, and see if that doesn't help.

Tuesday, May 14, 2013

Bag

I had fun figuring out how to make this bag. I combined techniques that I read about in three different tutorials, including the "hot dog" method from a 4-H sewing class, French seams from the bag tutorial on the Did You Make That blog, and pockets and handles from the free Craftsy class about bag making.
Front with pocket


Back with no pocket


Insides show the simple but effective fished edges of the "hot dog" method. Here is a PDF tutorial that explains it better than I ever could. I was just tickled with the results. Hot Dog!

French seams to finish the inside

Wednesday, May 8, 2013

Trying to find the Right Fit

I've been working on figuring out my fit for a bodice, or in my upper body. Barbara Deckert's Sewing for Plus Sizes class on Craftsy.com has helped, but I still had unanswered questions. I sewed up a muslin of the Vogue pattern that she is working with, and I used size 20 based on what she recommended. Here are some of the questions that I asked her. I probably should have stopped after that first one: "Should I have used a smaller size?"

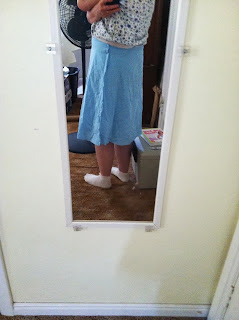
Should I have used a smaller size? My upper chest measurement fell between an 18 and a 20, so I went with the 20, but it looks to me like I could take a pleat in the center front right at the neckline, so I'm wondering if the 18 would have been better. On the other hand, even though the front seems a bit big, the back pulls when I reach my arms forward.(I went ahead and sewed both sleeves in specifically so I could test this.) This is a problem I always seem to have. Should I make a broad back adjustment? (I already did a rounded back adjustment on the pattern tissue. I uploaded those pics to the project page.) Also,  I've always been small-busted, so I didn't need to increase the cup size. I did, however, move the apex points out further away from center front. Now I'm thinking the darts are too long as they seem to end right at my apexes. What do you think? And I'm wondering if I should take out some of the fullness of the darts. Also, should I make adjustments for not being symmetrical? I can see that my left shoulder is higher than my right, and I think that affects the fit overall. Next question: should I shorten the length of the bodice to the original length? I had lengthened the front and the back each by 2 1/2 inches. I'm not sure where my waist is, so I went with where my pants fall. I wore the muslin while moving around the house a bit, and the waist seam kind of crept up to above my abdomen rather than below. It's more comfortable up there, but I think having the seam right there makes me look even fatter. Here's another question: There are wrinkles on the front near the armscye. Do I need to take out some of that shoulder seam length? (Maybe a smaller size pattern would take care of that?) 


Well, this is what she said in reply:
Instead of answering all your questions one by one, let me tell you what Is would do with this if I were doing the fitting: 1. Shorten shoulder length in front neck area to tighten up the neckline; also stay the neckline if needed to eliminate the gapping. 2. Offset the shoulder seam so that it rides the center top of the shoulder and does not pitch forward. 3. Shorten the shoulder length so that the armscye seam intersects the shoulder joint. 4. Re-set the sleeve and see if it no longer forms horizontal sag lines since it will now be lifted higher on the arm. 5.. Shorten the length of the front waist dart so that then end 1" below the apexes. 6. I think this top might look better on you with a slightly raised waistline, as it is drafted, so that it skims the midriff area, so raise the waist front and back by just pinning the peplum onto the bodice a couple of inches higher, which will make the top shorter, so if you want more length you can adjust the peplum length at the hemline. Really, the only thing you couldn't change at this point had you cut the top in fashion fabric is the overall length! I would re-pin, re-baste, and do another try on; send pics and I will be happy to check it out.

It is helpful, yes, but how I wish she were with me in person to help me do those things. 1.How do I shorten the shoulder length in the front neck area to tighten up the neckline, and how do I stay the neckline to eliminate the gapping? 2.How is the shoulder seam pitching forward? Does that mean that I should pull the front up? Or maybe the back at the shoulder seam? 3. I can see shortening the shoulder length so that the armscye seam intersects at the shoulder joint, but, again, I think using a smaller size would make a difference there...

Well, you get the idea.

What I did was re-sewed a new muslin the smaller, size 18 size. And it seemed to work better. But I still wasn't sure where that peplum thing should fall; in other words, Where's my waist?


So, I gave up on that pattern for the time-being. I'm not sure I like it anyway. I couldn't get the darts to stop at the right point, and the upper chest area just seemed huge, even in an 18.

Next I sewed up the muslin for a free online pattern that I downloaded from fabrics.com for a gypsy-style peasant top. I really liked the look of it. In the line-drawing, that is.
It has princess-style seams with gathering across the top shoulders of them to attach the sleeves, and a bias-tape-finished neckline with a keyhole and a tie. I sewed it up in some scrap fabric, and I liked the neckline and the fact that it was modest. It just looked like a big sack on me, though. I thought about cutting it off shorter, or putting a belt on it, or putting a drawstring in the bottom for a blouson effect. But I couldn't get over the fact that it was one big square sack. Plus it, too, was baggy in front. I mean, what can you expect from a one-size-fits-all-type pattern. I had cut out it out in the size 18, so maybe it would work better in a smaller size. But I didn't feel like using more fabric to once again make up a muslin, so decided to let it go for the time-being as well.

And I started on this Simplicity 1914. I'm liking the style. I started with a muslin in a size 18. It, too, has princess seams. It has a wide banded neckline that I like because I think it gives the appearance of width to my upper body. I like the raglan sleeves. Between them and the neckline it reminds me a bit of the peasant top. The problem? Gaposis again. The neckline is gapping on me. It seems that I need to pull it up somehow, but there is nowhere to pull it up to. I played with the princess seams, and was able to take out some of the bagginess, and that helped. But I was left with these little pointy knobs where the apex should be. Except that the points ended up above my apex. So it looked pretty funny. But I think I can still work that out. Anyway, then I realized that I could pull the shirt up into the banded neckline area, and, guess what? It worked! I was able to get rid of some of that fullness in the upper chest, and the neckline wasn't gaping so much. I was much encouraged.

I had added 3/4 inch to the length of the upper back of the pattern piece because I believe that I have a rounded upper back. But maybe I don't really, as the back seems a bit saggy too.

However, there is room in the back for me to move my arms freely, and that is wonderful. I can reach forward without having the back pull tight. I don't know if that's because of the raglan sleeves. Speaking of the raglan sleeves, they almost seem like set-in sleeves. Because of how wide the neckline band is, the sleeves as they are set into neckband seem to fall pretty close to where the shoulder joint should be. I think I have narrow shoulders. What do you think?

Here are my fitting issues that I think I have:
Narrow shoulders
Forward-rotating shoulders
Broad, rounded back
Small upper chest area. By this I mean the upper bust area, but only in the front, from underarm crease to underarm crease.

Well, just now I was looking at fitting books on amazon.com, and I decided to check out Nancy Zeiman's book about fit: Pattern Fitting with Confidence. She's the television sewing lady. I looked at the first few pages, about taking measurements, and she talks about the "Right Size Measurement." She says that if your Right Size Measurement is 14 inches, then you're a size 14, and each half inch greater or less than that is the equivalent of a size. So, I took that measurement on me, and, guess what? It's 14 or 14 1/2 inches (I'm not sure which). That means that I would be a size 14 or a size 16.

Maybe that's why my mother always used a size 14 pattern. I mean, I've noticed in my pictures of my back that I have the same posture as my mother. And I wear the same bra size that she wore. So maybe I'm the same size as her? Yet all my measurements say that I'm a size 18. But size 18 doesn't fit in the front upper chest area. I think it's because of my big back taking up all that measuring tape length.

What to do? I'm going to keep experimenting with pattern sizes. I will finish up this Simplicity pattern in the size 18 that I cut it, and see if I can get the front to fit using those princess seams and the banded neckline as places that I can adjust. And then after that, for the next pattern that I sew, I'm going to try a size 16. Maybe I'll keep a bigger size in the back, but smaller in the front. Is that allowed?

We shall see.

Monday, May 6, 2013

The Great British Sewing Bee

I was just introduced to this television series by some fellow sewing bloggers. I enjoyed watching this video. I hope that some day I can learn to sew clothes that fit me.

Wednesday, May 1, 2013

McCall's 6035


I did it! Here's my first project. I actually completed it a week ago today. I wore it to the temple on Thursday and to church on Sunday, and in both places received many compliments. It fits, and I really like this pattern. 

Today I'm starting a new blouse. Fabric.com sent me an email with an invitation to download a blouse a pattern, which I did. It involved printing and taping together 25 pages. I laid them out on the living room floor and used pins to hold the corners together, then taped the edges. Then I picked up the whole thing and put it on the kitchen table, where I traced what I hope is my size--Size 18--onto tracing paper. Now I'll be cutting it out of some scrap fabric and sewing it up to see if it'll work to sew the blouse.

Monday, April 22, 2013

Join the Challenge: Sew Your Own Clothes for a Year!

I'm going to join the challenge of sewing my own clothes for a year. I'm going to start with the "Me-Made Mondays." That means that each Monday you wear something you made.

I'm excited!

There's a whole blog about it, but apparently I missed their time period for joining. No matter. I'm going to do it anyway. This is now my sewing blog.

First up: McCall's 6035 View C. I started it today. I plan to wear it to the temple on Thursday, to church on Sunday, and, of course, next Monday for the Me-Made Monday.